
How to Build a Garden Shed Workbench
If you’ve ever fumbled with tools, seed trays, or paint cans in your shed, you already know the value of a solid workspace. A garden shed isn’t just for storage — it can be a productive, peaceful place to work. That’s where a well-built workbench comes in. Whether you’re potting plants, repairing gear, or organizing your tools, learning how to build a garden shed workbench is a simple upgrade that can totally change the way you use your space.
Let’s walk through what makes a great workbench — and how to build one that fits your shed and your workflow perfectly.
Why Your Garden Shed Needs a Workbench 🪴🔨
The right workbench can turn a storage shed into a functional backyard workshop. Instead of crouching on the floor or hauling everything to your porch, you’ll have a dedicated place to get things done. From spring planting to weekend repairs, it becomes your go-to zone for quiet, hands-on productivity.
And the best part? You don’t have to buy something pre-made or overpriced. You can build a sturdy, custom-fit garden shed workbench in just a day or two with a few basic tools and materials.
How to Build a Garden Shed Workbench That Lasts 🛠️
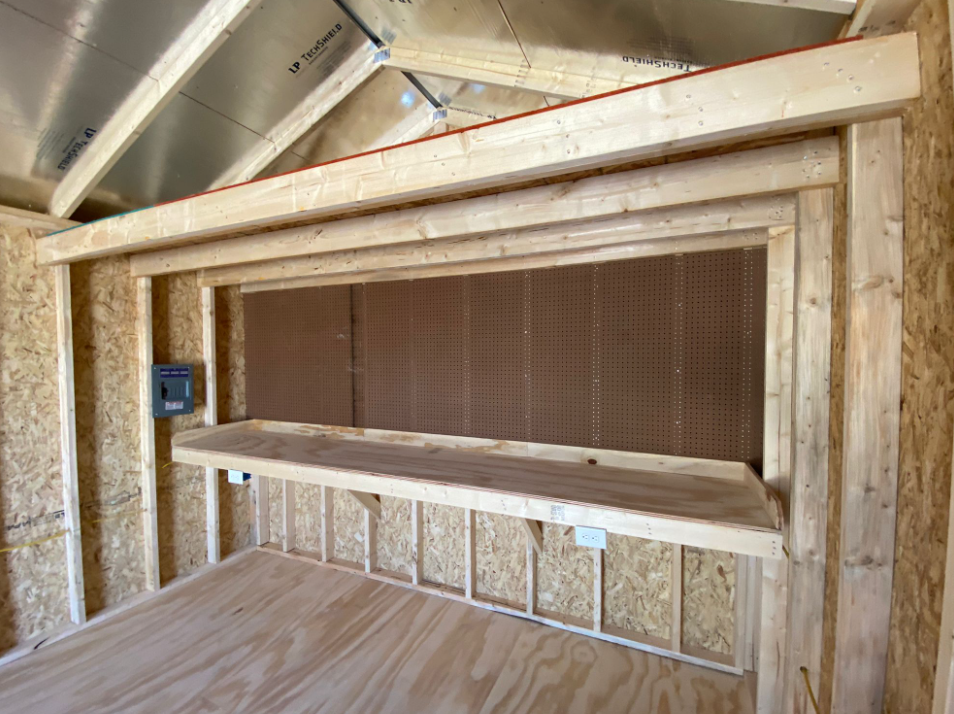
Start by measuring the available space in your shed. You want enough room to work comfortably without blocking the flow of movement. Most people opt for a workbench that’s about 24 to 30 inches deep and between 5 and 8 feet wide. Keep in mind what you’ll be using it for — gardening, woodworking, repairs — and tailor the height and surface material accordingly.
Use pressure-treated lumber for durability, and don’t forget to anchor the legs securely to the wall or floor if you’ll be using heavy tools. A plywood top works great for most uses, but you can add a hardwood layer or rubber mat for grip and longevity.
Want extra functionality? Add a lower shelf for storage, a pegboard back for tools, or hooks underneath for hanging bags or gloves. Keep it simple, but make it yours.
Garden Shed Workbench Must-Haves 🔧🌿
When you’re learning how to build a garden shed workbench, think about how you’ll use it day to day. Potting trays? Give yourself waterproof lining or drainage. Tool-heavy projects? Reinforce the frame and add outlets nearby if your shed has power. Want it to look sharp too? Sand and seal it for a finished, polished feel that lasts through every season.
Remember — the best workbench is the one you’ll actually use. Build it at the height that feels right. Place it where light hits. Keep your most-used tools within reach. Small tweaks make a big difference.
Build It Once, Use It Forever
Once your workbench is in place, you’ll wonder how you ever worked without it. A well-constructed bench turns your garden shed into a place of purpose. It keeps your projects organized, your back happy, and your tools off the ground. Whether you’re a weekend gardener or a daily DIYer, it’s the one feature you’ll use again and again.
At Wolf Valley Buildings, our customers often add workbenches to their custom shed designs — and for good reason. They’re simple, smart, and make your shed feel like a real workspace.
So if your shed’s just holding stuff, maybe it’s time it started helping you get things done.
Internal Links:
Why a Quality Shed Is a Better Investment Than a Big Box Build
Leave a Reply